Gigi Labs

Please follow Gigi Labs for the latest articles.
Showing posts with label dictionaries. Show all posts

Saturday, March 22, 2014

C# AppSettings: Launching Programs and Storing AppSettings

Hi all! :)

Today we're going to write a little program that can start other programs. For example, it might launch MS Word, or your favourite browser. From this we will learn how to actually start other programs using C#, and also how to add settings into an application configuration file so that they can easily be changed.

Start off by creating a new Console Application using your favourite IDE. Throw out any code already in Main(), and add this initial code:

            Console.Title = "Launcher";
          
            // TODO code goes here
          
            Console.ReadLine();

Now, to start a program from our code, we need to use the Process class. To be able to use it, we need to add the following to our usings:

using System.Diagnostics;

Starting a program is really easy. All we need to do is replace our "TODO" comment with the following:

            string filePath = @"C:\tools\notepad++\notepad++.exe";
            Process.Start(filePath);

And sure enough, when we run our program, Notepad++ is opened as well:


Let us now take this a step further. We can allow the user to type in the name of an application, and the corresponding application will be launched. We could do this using a switch statement as in "C# Basics: Command Interpreter Using Methods". Or even better, we can use a Dictionary to store the relationship between application names and their path. First, add the following using at the top if it's not there already (e.g. if you're using SharpDevelop):

using System.Collections.Generic;

Next, our Dictionary, using the collection initialiser syntax as in "C# Basics: Morse Code Converter Using Dictionaries":

            Dictionary<string, string> programs = new Dictionary<string, string>()
            {
                { "notepad++", @"C:\tools\notepad++\notepad++.exe" },
                { "firefox", @"C:\tools\firefox\firefox.exe" }
            };

We can now accept user input and launch the appropriate program. Replace the two lines we wrote earlier (which include the call to Process.Start()) with this:

            Console.Write("Enter program to launch: ");
            string programName = Console.ReadLine();
            if (programs.ContainsKey(programName))
            {
                string path = programs[programName];
                Process.Start(path);
                Console.WriteLine("{0} launched from {1}", programName, path);
            }
            else
                Console.WriteLine("Unknown program");

The user gives us the name of the program he wants to launch. If that name exists in our dictionary, we get the corresponding path, and then launch it as we did before. If we try this now, it works pretty nicely:


Although this works pretty well, it isn't very flexible to have the program names hardcoded in your program code. Imagine you give this program to a friend. It wouldn't be very useful if he could only launch Firefox and Notepad++. What if he wanted to be able to launch SharpDevelop as well? And maybe in future he might want to add VLC as well. It obviously isn't convenient for you to have to change the code, recompile, and give him an updated program each time.

One option could be to store these program settings in a file and read it, but .NET provides us with a simpler option that exists specifically for this kind of scenario. .NET applications can optionally come with an application configuration file, which is usually called App.config. In fact, if, like me, you're using SharpDevelop 5 Beta 2, you should have one already (otherwise just add an Application Configuration File to your project):


When you build the application, App.config gets renamed to the name of the executable, plus a ".config", and is stored in the same folder:


In this App.config file, under the <configuration> node, we can add an <appSettings> node and store our settings. The settings have a key, which is a name that identifies them, and a value which is the value of the setting. Ours will be like this:

    <appSettings>
        <add key="notepad++" value="C:\tools\notepad++\notepad++.exe" />
        <add key="firefox" value="C:\tools\firefox\firefox.exe" />
    </appSettings>

With this done, we can now rewrite our program to use these settings. First, we need to add a reference to System.Configuration. To do this, right click on the name of the project in Solution Explorer, and select "Add Reference":


In the "Add Reference" window, locate "System.Configuration" and then click "OK".

Next, add the following using statement at the top:

using System.Configuration;

We can now use ConfigurationManager to obtain our app settings, like this:

        public static void Main(string[] args)
        {
            Console.Title = "Launcher";
           
            string firefoxPath = ConfigurationManager.AppSettings["firefox"];
            Console.WriteLine(firefoxPath);
           
            Console.ReadLine();
        }

...And here's what we see when we run this:


So now, all we need to do is let the user tell us which program he wants to launch, and find it in the AppSettings:

        public static void Main(string[] args)
        {
            Console.Title = "Launcher";
           
            Console.Write("Enter program to launch: ");
            string programName = Console.ReadLine();
           
            string path = ConfigurationManager.AppSettings[programName];
            if (path == null)
                Console.WriteLine("Unknown program.");
            else
            {
                Process.Start(path);
                Console.WriteLine("{0} launched from {1}", programName, path);
            }
           
            Console.ReadLine();
        }

The only thing worth noting here is that if the specified key does not exist in the AppSettings, retrieving that key via ConfigurationManager.AppSettings[] returns null, allowing us to take appropriate action in that case.

So now, when you give this program to a friend, he can just add the following line in the CsAppSettings.exe.config file that conveniently comes with the program:

         <add key="fiddler" value="C:\tools\fiddler2\Fiddler.exe" />

...and without further ado, he can now launch Fiddler as well:


Wonderful! :)

In this article, we learned how to start another program from our code, and we also learned how to work with application settings in an application configuration file.

Storing your application settings in an App.config file is convenient because they can be tweaked as needed, without having to recompile your program. These kinds of settings are best suited for settings that don't change frequently, so you just set them when you need them, and forget about them. In the next article, we'll learn about another kind of settings that are great for storing stuff like user preferences which can potentially change a lot.

Saturday, June 15, 2013

Indexing and Search (C#)

Hello once again, and welcome to this new article at Programmer's Ranch! :)

Today we're going to talking about indexing and search: what is it that allows you to search through thousands of documents in less than a second?

In order to understand how indexing works, we will use an example where we have the following three documents:

        doc1.txt contains:
        The Three Little Pigs

        doc2.txt contains:
        The Little Red Riding Hood

        doc3.txt contains:
        Beauty And The Beast

Now, let's say you want to find out which of these documents contain a particular word, e.g. "Little". The easiest way to do this would be to go through each word in each document, one by one, and see if the word "Little" is in that document. Conceptually, we're talking about this:


Doing this in C# is very easy:

            String[] documents = { "doc1.txt""doc2.txt""doc3.txt" };
           
            String keyword = Console.ReadLine();
           
            foreach (String document in documents)
            {
                if (File.ReadAllText(document).Contains(keyword))
                {
                    Console.WriteLine(document);
                }
            }

            Console.ReadKey(true);

Remember to put in a using System.IO; at the top, to be able to use File. If you press F5 and test this program, you'll see that it works:


However, this method isn't good because it will take longer as the documents get larger (more words) and more numerous (more documents).

The proper way to process search requests quickly is to build an index. This would look something like this:


The index stores a list of all words, each with a list of documents that contain it. If you compare it with the first diagram, you'll notice that we reversed the mapping of words and documents; this is why we call this an inverted index.

We can do this in C# by first building the index (remember to add using System.Collections.Generic; at the top):

            // Build the index
           
            String[] documents = { "doc1.txt""doc2.txt""doc3.txt" };
            Dictionary<String, List<String>> index = new Dictionary<String, List<String>>();
           
            foreach (String document in documents)
            {
                String documentStr = File.ReadAllText(document);
                String[] words = documentStr.Split();
               
                foreach (String word in words)
                {
                    if (!index.ContainsKey(word))
                        index[word] = new List<String>();
                   
                    index[word].Add(document);
                }
            }

...and then using the index to search the documents quickly and efficiently:

            // Query the index
           
            String keyword = Console.ReadLine();
           
            if (index.ContainsKey(keyword))
            {
                foreach (String document in index[keyword])
                {
                    Console.WriteLine(document);
                }
            }
            else
                Console.WriteLine("Not found!");

            Console.ReadKey(true);

In this way, there is no need to search every document for the keyword each time the user wants to search for a word. The keyword is simply located in the index (if it exists), and a list of documents that contain it is immediately available:


This was a simple proof of concept of how indexing and search works, but here are a few additional notes:

  • The index is usually built as documents are added to it, and then stored in one or more files (unlike in this program, where the index is rebuilt every time the program is run - that's just to make the illustration easier).
  • Words such as "and" and "the" which are very common are called stop words and are normally excluded from the index.
  • It is common practice to make searches case insensitive, e.g. by converting indexed words and query keywords to lowercase.

This article presented the concept of indexing and how it is used to search for a single keyword. Although there are other techniques used in text search, indexing is definitely one of the most important, and has many applications including databases and text retrieval (e.g. search engines). A fundamental concept to remember is that the whole point of indexing is to make search fast!

Thanks for reading! :) Feel free to leave feedback (positive or negative) either in the comments or by contacting me. Remember to subscribe to the Programmer's Ranch Facebook page to stay up to date with articles as they are published!

Sunday, May 12, 2013

C# Basics: Morse Code Converter Using Dictionaries

Hi all! :)

Today's article is an easy one. We're going to learn to use dictionaries, and use them to make a program that converts text into the Morse Code equivalent.

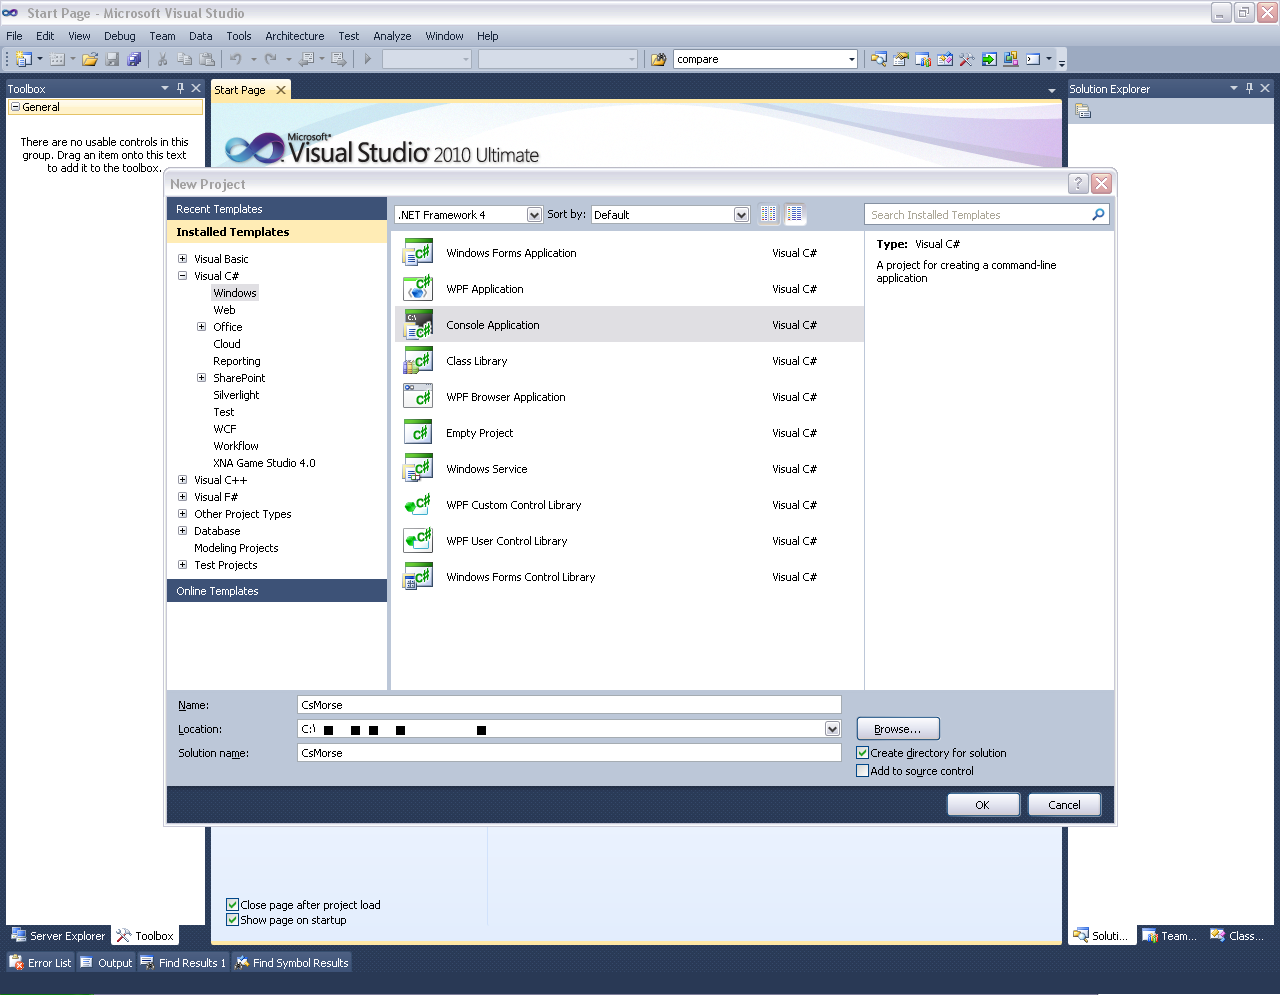
Just for a change, today I'm going to use Visual Studio 2010 instead of SharpDevelop. If you want to try it, grab an express edition from Microsoft's website. Otherwise, you can manage just as well with SharpDevelop. Let's start off by creating a new console application. In Visual Studio, you can click on the "New Project..." link below the VS logo, or else from the menu, File -> New -> Project...:


Under Visual C# -> Windows, select "Console Application". As with SharpDevelop, specify a name for the project and where to put it. Note: I'm using the Ultimate edition, so your Express edition will be a little different (e.g. less project types).


The sample code given by Visual Studio is a bit different from that of SharpDevelop:

using System;
using System.Collections.Generic;
using System.Linq;
using System.Text;

namespace CsMorse
{
    class Program
    {
        static void Main(string[] args)
        {
        }
    }
}


In particular, there's nothing in Main(). It doesn't matter. However, if you're using SharpDevelop, you're going to need the using System.Collections.Generic; so make sure you add it.

So, now we're going to make a little program based on the Morse Code. In case you don't know, the Morse Code is something that Chuck Norris used to communicate with the aliens who built the pyramids in Egypt. Obviously, he was the one telling them how to construct them.

As you can see from the Wikipedia link in the previous paragraph, each letter of the alphabet has a corresponding representation in Morse as a series of dots and dashes. In order to speed up transmissions, more common characters (e.g. 'E') are much shorter than others.

In C#, we can use a dictionary to map keys (e.g. 'L') to values (e.g. ".-.."). In other programming languages, dictionaries are sometimes called hash tables or maps or associative arrays. The following is an example of a dictionary mapping the first two letters of the alphabet to their Morse equivalents:

            Dictionary<char, String> morse = new Dictionary<char, String>();
            morse.Add('A', ".-");
            morse.Add('B', "-...");

            Console.WriteLine(morse['A']);
            Console.WriteLine(morse['B']);

            Console.WriteLine("Press any key...");
            Console.ReadKey(false);

First, we are declaring a dictionary. A dictionary is a generic type, so we need to tell in the <> part which data types we are storing. In this case, we have a char key and a String value. We can then add various items, supplying the key and value to the Add() method. Finally, we get values just like we would access an array: using the [] syntax. Just that dictionaries aren't restricted to using integers as keys; you can use any data type you like. Note: you'll know from the previous article, "The ASCII Table (C#)", that a character can be directly converted to an integer. Dictionaries work just as well if you use other data types, such as Strings.

Here is the output:


If you try to access a key that doesn't exist, such as morse['C'], you'll get a KeyNotFoundException. You can check whether a key exists using ContainsKey():

            if (morse.ContainsKey('C'))
                Console.WriteLine(morse['C']);

OK. Before we build our Morse converter, you should know that there are several ways of populating a dictionary. One is the Add() method we have seen above. Another is to assign values directly:

            morse['A'] = ".-";
            morse['B'] = "-...";

You can also use collection initialiser syntax to set several values at once:

            Dictionary<char, String> morse = new Dictionary<char, String>()
            {
                {'A' , ".-"},
                {'B' , "-..."}
            };

Since we only need to set the Morse mapping once, I'm going to use this method. Don't forget the semicolon at the end! Replace your current code with the following:

            Dictionary<char, String> morse = new Dictionary<char, String>()
            {
                {'A' , ".-"},
                {'B' , "-..."},
                {'C' , "-.-."},
                {'D' , "-.."},
                {'E' , "."},
                {'F' , "..-."},
                {'G' , "--."},
                {'H' , "...."},
                {'I' , ".."},
                {'J' , ".---"},
                {'K' , "-.-"},
                {'L' , ".-.."},
                {'M' , "--"},
                {'N' , "-."},
                {'O' , "---"},
                {'P' , ".--."},
                {'Q' , "--.-"},
                {'R' , ".-."},
                {'S' , "..."},
                {'T' , "-"},
                {'U' , "..-"},
                {'V' , "...-"},
                {'W' , ".--"},
                {'X' , "-..-"},
                {'Y' , "-.--"},
                {'Z' , "--.."},
                {'0' , "-----"},
                {'1' , ".----"},
                {'2' , "..---"},
                {'3' , "...--"},
                {'4' , "....-"},
                {'5' , "....."},
                {'6' , "-...."},
                {'7' , "--..."},
                {'8' , "---.."},
                {'9' , "----."},
            };


            Console.WriteLine("Press any key...");
            Console.ReadKey(false);


In the empty space between the dictionary and the Console.WriteLine(), we can now accept user input and convert it to Morse:

            Console.WriteLine("Write something:");
            String input = Console.ReadLine();
            input = input.ToUpper();

            for (int i = 0; i < input.Length; i++)
            {
                if (i > 0)
                    Console.Write('/');

                char c = input[i];
                if (morse.ContainsKey(c))
                    Console.Write(morse[c]);
            }

            Console.WriteLine();

Here, the user writes something and it is stored in the input variable. We then convert this to uppercase because the keys in our dictionary are uppercase. Then we loop over each character in the input String, and write its Morse equivalent if it exists. We separate different characters in the Morse output by a forward slash (/). Here's the output:


Awesome! :) In this article we used Visual Studio to create a program that converts alphanumeric text into the Morse-encoded equivalent. In the process, we learned to use dictionaries, and also revisited things like for loops and String methods.

Watch this space for more practical articles! In particular, after a few more articles, we'll be doing some network programming. Some great stuff is coming your way. :)